Making a Payment
With Corpay Cross-Border you can enter and save the details for all of your payments first, and then get the rate and book the deal.
To make a payment
- In the toolbar, under, click .
Mandatory fields are indicated by an asterisk (*). - In the field, specify where you want to send the payment.
To narrow your search, start typing a sequence of characters that are in the beneficiary's name. As soon as you enter at least three characters, the system starts searching for matches. All beneficiaries with details that match the search criteria you entered are displayed in a dropdown list, and the matching portion is underlined. The more characters you enter, the more refined the search results. Choose the beneficiary from the dropdown list.
Note: The characters you use to search are not context sensitive, and can include spaces.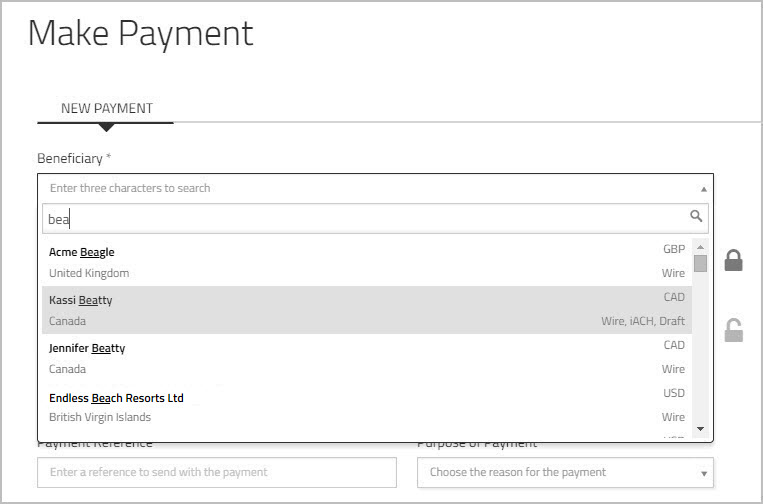
The and fields auto-populate, based on the beneficiary details. Once you have chosen a beneficiary, you can hover your mouse over the label (just below the field) to view a summary of the information for that beneficiary.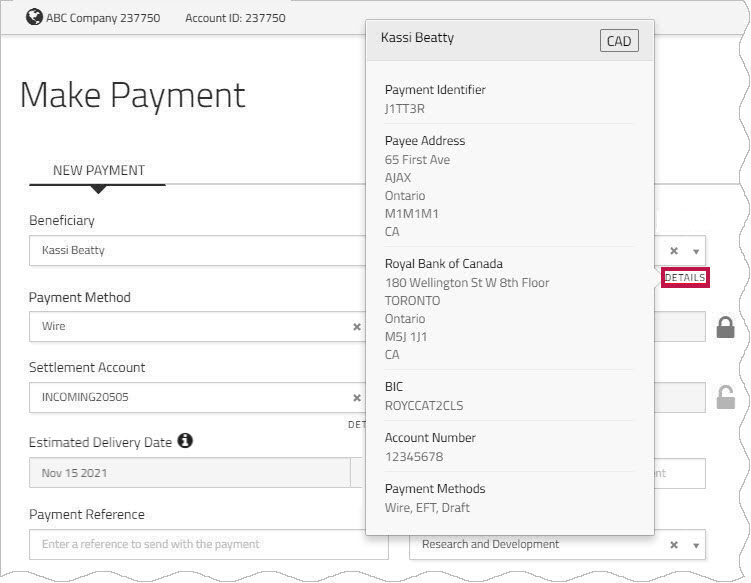
 How to send the payment to your Multi-Currency Account
If you are enabled to use Multi-Currency Account, follow these steps to send the payment to your Multi-Currency Account instead of to a beneficiary.
- Click the toggle, which is located above the field.
The field name changes to .
- From theMulti-Currency Account dropdown list, choose the Multi-Currency Account to which you want to send the payment.
Note: When you are sending the payment to a Multi-Currency Account, you are not required to complete the or fields.
After you select the Multi-Currency Account, you can hover your mouse over the label (just below the field) to view summary information.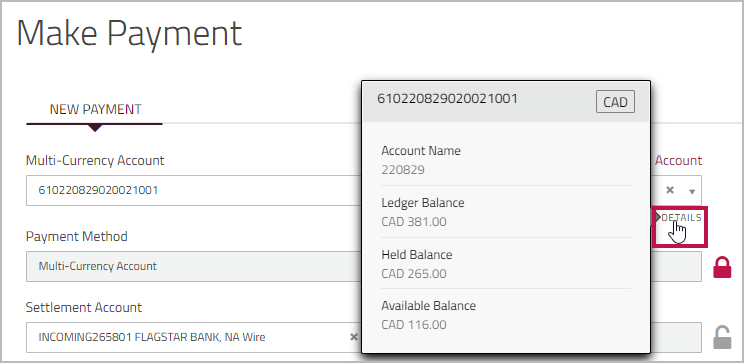
Multi-Currency Account details include:- —The amount that was in the Multi-Currency Account at the end of the previous business day.
- —The amount in the Multi-Currency Account that is allocated to cover payments that have been scheduled but are still incomplete or outstanding.
- —Ledger value minus Balance Held value. This is the amount that is available to use.
- Click the toggle, which is located above the field.
- The field displays the preferred method of payment for this beneficiary. However, if more than one method is allowed, you can choose a different method from the dropdown list.
-
By default, the field displays the preferred account but if there is more than one available account, you can choose another account from the dropdown list. If you are enabled to use Multi-Currency Account, your Multi-Currency Accounts will also appear in the dropdown list.
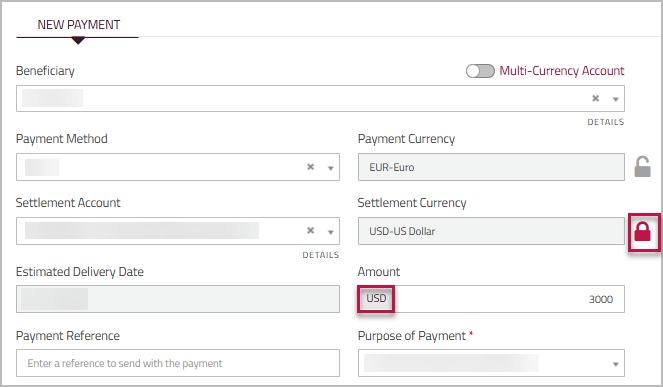
Once you have chosen the settlement account, you can hover your mouse over the label (located just below the field) to view information about that account, for example, the bank name and settlement method. - If the and the are not the same, use the
 locked icon to determine how you want your payment to be calculated. The value that you enter in the field is considered to be in whichever currency is locked.
- locked—The beneficiary or Multi-Currency Account will receive the exact amount you enter in the field.
- locked—The beneficiary or Multi-Currency Account will receive the amount that results from converting the settlement currency into the payment currency.
- In the field, enter the amount of the payment.
-
Once the , , and fields are populated, the displays the earliest date that the payment can be delivered to the beneficiary. Note: This field is displayed only for .
If you are enabled for , you can select a different delivery date.
Note: If your account is not currently enabled for the feature, and you would like to learn more about it, please contact your Account Manager.How to use Scheduled Payments to select a different delivery date
- Click the calendar icon beside the field.

- In the calendar that appears, select the date you want.
Any dates that are outside of the delivery date range for this beneficiary are greyed out in the calendar.
Important: To ensure that the funds are delivered on the specified date, we recommend that you select a date that is at least 6 business days from the current date.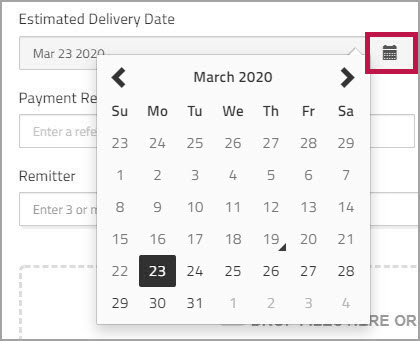
If you try to select a date that falls on a weekend or holiday in the beneficiary's country, you will see an error message.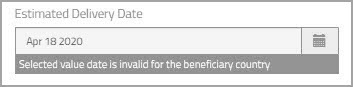
- Click the calendar icon beside the field.
- Optionally, in the field, enter any information that you want to send with the payment.
- From the dropdown, choose the option that best reflects the reason you are sending funds to the beneficiary.
- Optionally, in the field, enter an internal note or reference for the payment. This note will display in Cross-Border reports only and will not be displayed on the deal confirmation.
- If applicable, from the dropdown, choose the remitter on whose behalf the payment is being sent.
To narrow your search, start typing a sequence of characters that are in the remitter's name. As soon as you enter at least three characters, the system starts searching for matches. All the remitters that match what you enter are displayed in a dropdown list, and the matching portion is underlined. The more characters you enter, the more refined the search results. Click to select the remitter you want.
Once you have chosen a remitter, you can hover your mouse over thelabel (just below the field) to view a summary of the information for that remitter. If any details are not available, the field displays . The field can be set as mandatory across all payment flows in Corpay Cross-Border. Please speak with your account representative to enable the configuration. - Optionally, attach any related files.
For information on how to attach files to a payment, see Attaching documents to payments. - Click to save the payment details.
- Repeat these steps to add additional payments.
- When you have added all of your payments, proceed to the section Booking the Deal.
EXAMPLE
In this scenario, the (EUR) is locked. This means that the Beneficiary will receive EUR 3,000. To determine the settlement amount, the EUR 3,000 will be converted into USD. The settlement amount depends on the conversion rate at the time that the order is booked. 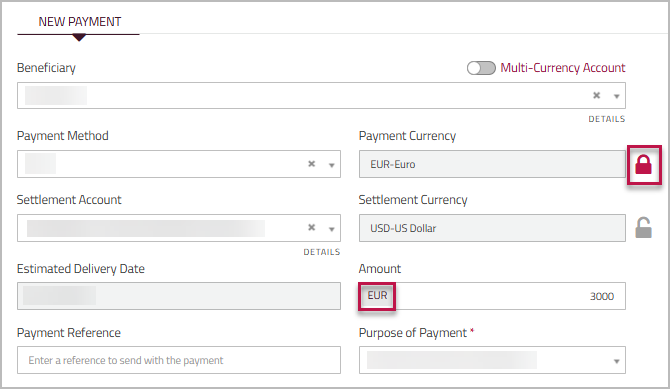
EXAMPLE
In this scenario, the Settlement Currency (USD) is locked. This means that the order will be settled by $3,000 in USD, and the beneficiary will receive the amount that results from converting USD $3,000 to EUR. The amount the beneficiary receives depends on the conversion rate at the time the order is booked.